Quickstart
译于官方Quickstart
我们在这里实现一个简单的API,为admin用户创建一个user和groups的编辑界面。
Project setup
创建一个名为 tutorial的Django项目,然后创建一个app命名为 quickstart
# Create the project directory
mkdir tutorial
cd tutorial

# Create a virtualenv to isolate our package dependencies locally
virtualenv env
source env/bin/activate  # On Windows use `env\Scripts\activate`

# Install Django and Django REST framework into the virtualenv
pip install django
pip install djangorestframework

# Set up a new project with a single application
django-admin.py startproject tutorial .  # Note the trailing '.' character
cd tutorial
django-admin.py startapp quickstart
cd ..
首先需要同步你的数据库
python manage.py migrate
然后创建一个管理员用户名为 admin ,在此将密码设为 password123。本例中将用这个账号进行认证登录。
python manage.py createsuperuser
创建完数据库和管理用户之后,接下来我们可以打开app目录,正式开始编程之旅…
Serializers
首先我们要定义几个serializers。 在项目目录下创建一个新的模块命名为 tutorial/quickstart/serializers.py ,我们将通过它来展示数据。
from django.contrib.auth.models import User, Group
from rest_framework import serializers


class UserSerializer(serializers.HyperlinkedModelSerializer):
    class Meta:
        model = User
        fields = ('url', 'username', 'email', 'groups')


class GroupSerializer(serializers.HyperlinkedModelSerializer):
    class Meta:
        model = Group
        fields = ('url', 'name')
请注意,我们在这里通过 HyperlinkedModelSerializer使用hyperlinking relationships。你可以改变引用来使用其他的relationships,但hyperlinking 是很好的 RESTful 设计。
Views
好的,接下来应该写一些views。请在 tutorial/quickstart/views.py 中键入以下内容。
from django.contrib.auth.models import User, Group
from rest_framework import viewsets
from tutorial.quickstart.serializers import UserSerializer, GroupSerializer


class UserViewSet(viewsets.ModelViewSet):
    """
    API endpoint that allows users to be viewed or edited.
    """
    queryset = User.objects.all().order_by('-date_joined')
    serializer_class = UserSerializer


class GroupViewSet(viewsets.ModelViewSet):
    """
    API endpoint that allows groups to be viewed or edited.
    """
    queryset = Group.objects.all()
    serializer_class = GroupSerializer
比起写多个view的做法,我们将所有的常用的behavior都写入一个类 ViewSets。当然,如果有需要也可以很容易的将其分割为多个view,但是使用viewsets能够使应用的逻辑更简洁易于管理。
URLs
下面该写API URLs ,其位于 tutorial/urls.py
from django.conf.urls import url, include
from rest_framework import routers
from tutorial.quickstart import views

router = routers.DefaultRouter()
router.register(r'users', views.UserViewSet)
router.register(r'groups', views.GroupViewSet)

# Wire up our API using automatic URL routing.
# Additionally, we include login URLs for the browsable API.
urlpatterns = [
    url(r'^', include(router.urls)),
    url(r'^api-auth/', include('rest_framework.urls', namespace='rest_framework'))
]
由于我我们在这里使用的viewsets 代替了 views,我们可以自动生成API的URL conf ,你只需要将viewsets注册到router即可。
另外,如果我们需要对API URLs进行更多的控制,那么可以使用原有的views方式,然后把 URL conf写清楚。
最后,通过可视化API,我们默认使用了login和logout的视图。 这个功能是可选的,不过当你需要可视化API或者你的API需要认证时,它将很有用。
Settings
我们还要进行一个全局设定,我们要开启分页功能,并且希望API只能被admin用户访问。进行这些设定的模块为 tutorial/settings.py
INSTALLED_APPS = (
    ...
    'rest_framework',
)

REST_FRAMEWORK = {
    'DEFAULT_PERMISSION_CLASSES': ('rest_framework.permissions.IsAdminUser',),
    'PAGE_SIZE': 10
}
Okay, we’re done.
测试我们的API
现在我们准备好测试刚刚创建的API,先通过命令行运行项目。
python ./manage.py runserver
可以用命令行或者curl之类的工具来访问API
bash: curl -H 'Accept: application/json; indent=4' -u admin:password123 http://127.0.0.1:8000/users/
{
    "count": 2,
    "next": null,
    "previous": null,
    "results": [
        {
            "email": "admin@example.com",
            "groups": [],
            "url": "http://127.0.0.1:8000/users/1/",
            "username": "admin"
        },
        {
            "email": "tom@example.com",
            "groups": [                ],
            "url": "http://127.0.0.1:8000/users/2/",
            "username": "tom"
        }
    ]
}
或者使用httpie,一个命令行工具
bash: http -a admin:password123 http://127.0.0.1:8000/users/

HTTP/1.1 200 OK
...
{
    "count": 2,
    "next": null,
    "previous": null,
    "results": [
        {
            "email": "admin@example.com",
            "groups": [],
            "url": "http://localhost:8000/users/1/",
            "username": "paul"
        },
        {
            "email": "tom@example.com",
            "groups": [                ],
            "url": "http://127.0.0.1:8000/users/2/",
            "username": "tom"
        }
    ]
}
当然也可以直接用浏览器
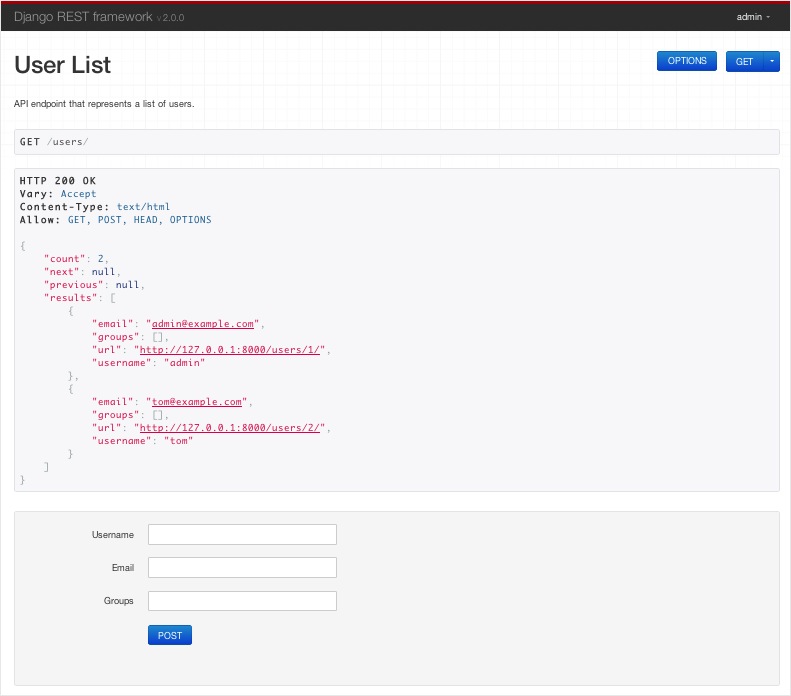
If you’re working through the browser, make sure to login using the control in the top right corner. Great, that was easy! If you want to get a more in depth understanding of how REST framework fits together head on over to the tutorial, or start browsing the API guide.